Welcome


Hi,

Welcome to my blog.

Thank you for visiting me :)

I hope you enjoy seeing what I have been up to
and that you visit again


Saturday, October 08, 2016

Vintage quilting


Begun on my sweet Sixteen - completed on my Sam

This was a delight to finish on Sam - my Simply Sixteen... I did have to think a bit about the backgrounds.


I was able to put the quilt on the frame in various ways - which was so helpful.  I have done all the Quilting in the corners - same design on each and then embroidered the center daisy's to match the original table cloth.  This is from from my Grandparents house,  probably sewn by one of my Aunties.
I was using the sidelight that is on trial  ( made by my DH after watching Jamie Wallen',s uTube video )


I have done a previous post on how I put this together - I think.. but this is how it was put together before the center added embroidery was done.


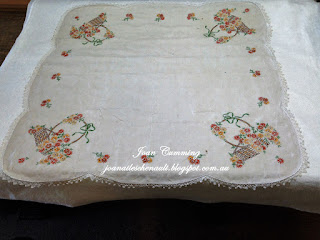
This is the completed Vintage tablecloth


Showing quiting details

And more .. the flowers on the left are the ones I have added on myself


Showing center design with my own embroidered flowers.

Another view

And lastly one of the corners.

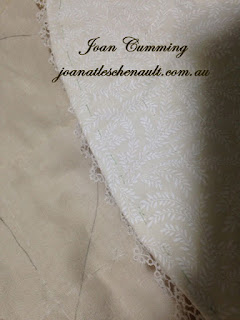
I have yet to go over the lace as some areas of it are torn...
Also there are two marks I was unable to get off
I also used Photoshop Elements 10 to get rid of the portable clothes frame that it was on at the time...not very well, but OK...so if some of the edges are a bit blurred..thats why.  

Another set of photos of a quilt I last completed on my Sweet Sixteen.

Now I am off to do some more sewing on Sam

Wednesday, October 05, 2016

Simply Sixteen - My Sam!

Long Time since I posted..lots I have been up to 

I now have a new machine...Simply Sixteen - his name being SAM..purchased about a month ago.

I practised on this piece for a few days  after Sam came home..... and have completed a couple of things since the play piece was sewn.
The first of which is my Red and White quilt... and  I remembered to put my trademark quilted ladybug on too.


This was my trial piece..an old sheet with cotton wadding.. I did the whole piece...then thought I needed to quilt a 'real' one and get serious!
 

I have had this one for quite some time - all basted and ready...so fortunate wasn't
 I :) and all safely clamped on to the frame.


Drew the circles in and the feathers...as the machine just ran away from me for a bit...I did use the circles to keep me on the right path...and also drew in the feathers..as when I did try the FMQ - the feathers went flat...it was easier to follow the lines...more or less.  All the filler was new to me but having it to do in each of the white blocks was really helpful as the design burnt into my tiny brain after a bit.


 I made myself a leader for the top bar..as I didn't have enough fabric to clamp it on at the top - It worked really well!
I pinned the quilt to this and clamped the leader to the bar.


 I found it also great to be able to turn the quilt any which way.. as wasnt comfortable with the lot of fabric on the top rail...but I did get more used to that as I went along.


I also made  long piece of wadding with fabric much the same as I was using...and un-clamped the quilt just near the end of the frame so I could just clamp this small piece to sew on, to check the tension ...I  could easily see to oil the bobbin each time too.


Close up of the finished top.  After I had completed all the white areas..blocks and borders.. I changed to a red thread and did the design - on I had learn t from Kimmy Brunner in a class I was lucky enough to have with her when she was here teaching at Handcrafters House.


This is the back - showing the red design a little clearer..its took a while to get directions right for a while - till it was really burnt in my mind.

This is the completed quilt..now I just have the binding to do...but first I need to get a label done..the binding is ready

I have had an absolute ball sewing this and have found my Sam...Simply Sixteen... to be so great to sew on.

I think this  took about 4 weeks to get completed...from the time I purchased Dam...so I am so happy now that I have him... 

I have completed another vintage tablecloth ...that was sewn mainly on my Sweet Sixteen - but I did all the reat of the fillers FMQ... I will blog on that soon.

I have Windows 10 now...hard for me!  and I did get PSE 14 - but I cant work it out..so have been using my PSE 10
and THATS why I have been so long away - well mainly :)

Nice to be back!

Sunday, April 17, 2016

Vintage quilting,

 I haven't been good at keeping up with my blog..however I thought I really should keep going with it.
So ...this is what I am currently working on .
Its a Vintage table cloth which belonged to my fathers family...
I have so many beautiful pieces here - its a shame to just leave them in the cupboard. 


This is the first corner ..so I have a long way to go.
I never really know how I am going to quilt things until I actually get started


Instead of putting this on a background to show it in a frame - I decided to keep it as  table cloth.
Because of this I needed to work out how to do the edge and still have the lace to show.  

I am thankful to Kelly Cline for mentioning this is how she does the vintage pieces...when not making them for framing.  She does beautiful work..vintage pieces on her longarm!

So this is a first to me...Many thanks to Kelly :) First I pinned and then basted with my Sweet Sixteen,  I cut the background fabric larger than the edge.
and then cut the cotton batting to fit just beyond the lace edge, as I wanted this to show.


I tacked the back fabric down over the batting and then machined them together with the top ..along the lace border
Above is the back after I had tacked it.
 

So this is my tablecloth with the backing secured and the top basted.

I have three more corners left to sew...and then I will work out what to put in the Middle..
A bit slow going as my back is very sore...but its good to have my mind taken off that :)

Thursday, April 14, 2016

Foundation piecing

I have been busy a while or so learning and sewing these foundation blocks.
I am doing a BOM with Sit Down Free motion Quilters.
Jeannie Harrison 's videos and instructions are really fantastic.. I couldn't have done this in a million years without her .. in fact its not something I thought i would ever do..
I am addicted.


Monday, February 15, 2016

FMQ, FMQ and playing, Designs, Catching up

Long time since I posted..

So here is some catching up a little.


I made a lot of these for gifts at Christmas time... .
I cant find all the photos I took of them...but here are a few

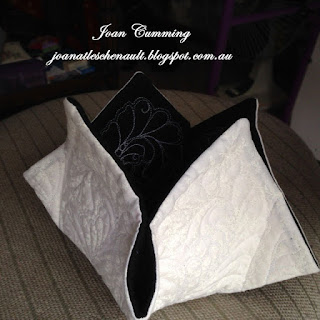
This is the back of the black fabric box... 
where I drew a small design to fit the sewn box

 This is the outside of the fabric box.

 
This is inside out - how I put it together


completed fabric box.. I sewed down the inside folds to make little pockets


A Vintage Piece to be completed..using my BFF - QP Curved
Template from Linda Hrcka of The quilted Pineapple... I really love this ruler...
its so easy to work with.

The last two are practice pieces for a soon to be given quilt which I will show later :)


This is a foundation BOM I am attempting...Slow goin, but very interesting.
Think I am Dyslectic...as it all looks a bit back to front ...lol

That's it for now - I will try to catch a=up a bit more later on.